Applicable models
All Battery Electric Vehicles (BEVs) and Plug-in Hybrid Electric Vehicles (PHEVs)
You are currently viewing content for the location:
International / English
Please select your region/language
You are currently in International
Intelligent charging functions are smart features that make charging your electric car at home more efficient and convenient. They optimise the charging process, adapt to your energy sources, and work seamlessly with your home’s electrical setup. These functions go beyond simple charging by providing additional control and automation options. They help you coordinate charging with your home energy needs and support efficient energy distribution.
With the Porsche Wallbox, which offers an integrated Energy Management System (EMS), you can take advantage of these intelligent features to enjoy a seamless charging experience. In the following sections, we’ll explain which functions are available, when they may be useful, and how to set them up.
Some details in this article are technical in nature. We recommend having a qualified electrician configure these settings when commissioning your Porsche Wallbox.
All Battery Electric Vehicles (BEVs) and Plug-in Hybrid Electric Vehicles (PHEVs)
Load Management helps ensure that your Porsche can be charged safely and reliably at home while making the best use of the available electrical capacity.
When charging your car, there are two key questions:
The first question is addressed by Static Overload Protection and Dynamic Overload Protection. These functions help ensure that charging remains within the available electrical capacity of your home.
The second question becomes important when multiple Porsche Wallboxes are connected to the same electrical circuit. In this case, Load Balancing manages how the available charging power is distributed among the connected Wallboxes.
Together, these functions help provide a safe, reliable, and efficient charging experience tailored to your home's electrical setup.
Available Load Management functions:
When a Load Management function is active, the Porsche Wallbox automatically adjusts the charging power based on the available electrical capacity and the configured setup. As a result, any charging power limits set in the My Porsche app and/or Porsche Wallbox Web app are overruled.
Static Overload Protection helps prevent your home's electrical capacity from being exceeded by applying a fixed charging limit. This ensures safe and reliable charging, even when the available electrical capacity is limited. Unlike Dynamic Overload Protection, the charging power is not continuously adjusted based on real-time household consumption. This makes Static Overload Protection a simple and effective solution when the available capacity is known and remains constant. No external energy meter is required to use this function.
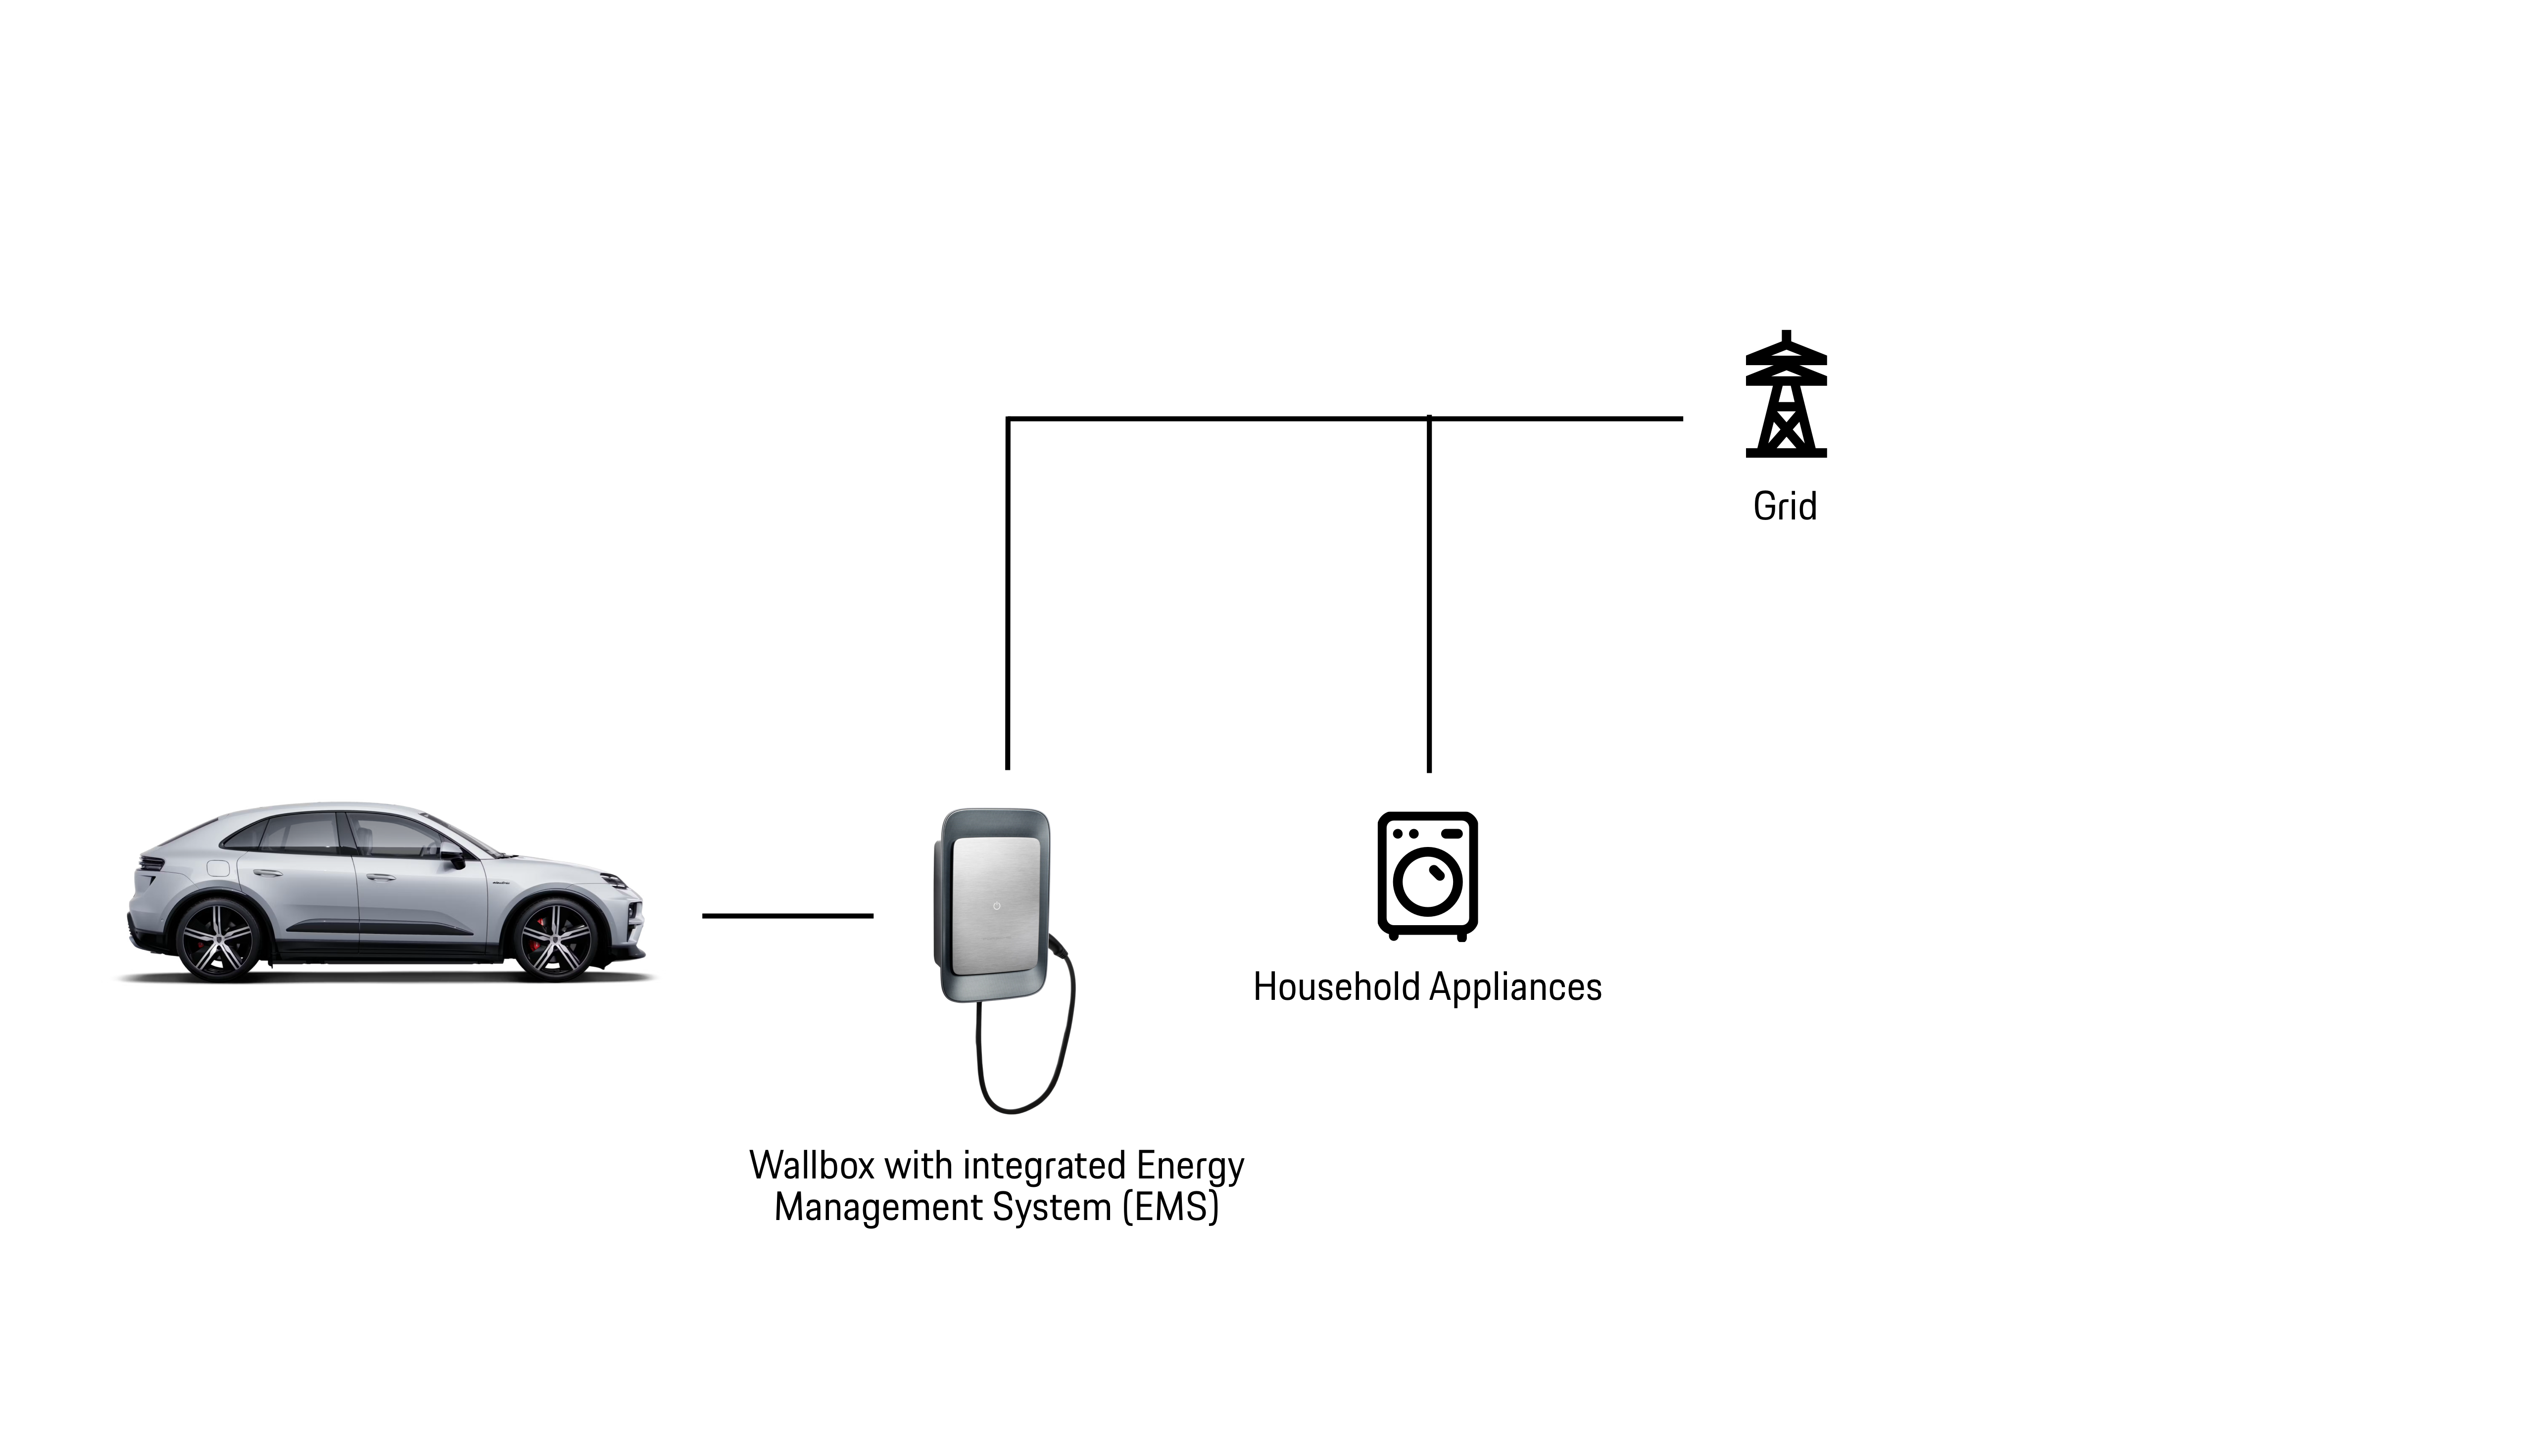
When several high-power devices in your home, such as a heat pump, oven, or electric car, are used at the same time, electricity demand can quickly increase. Dynamic Overload Protection automatically adjusts the charging power of your Porsche Wallbox based on the household's current energy consumption. This helps prevent the available electrical capacity from being exceeded, ensuring reliable charging while keeping other household devices running smoothly. To use this function, a compatible external Modbus meter must be installed and connected to the Porsche Wallbox.

Load Balancing enables multiple Porsche Wallboxes to operate safely on the same electrical circuit. It automatically distributes the available charging power among all connected Wallboxes to help prevent the circuit from being overloaded.
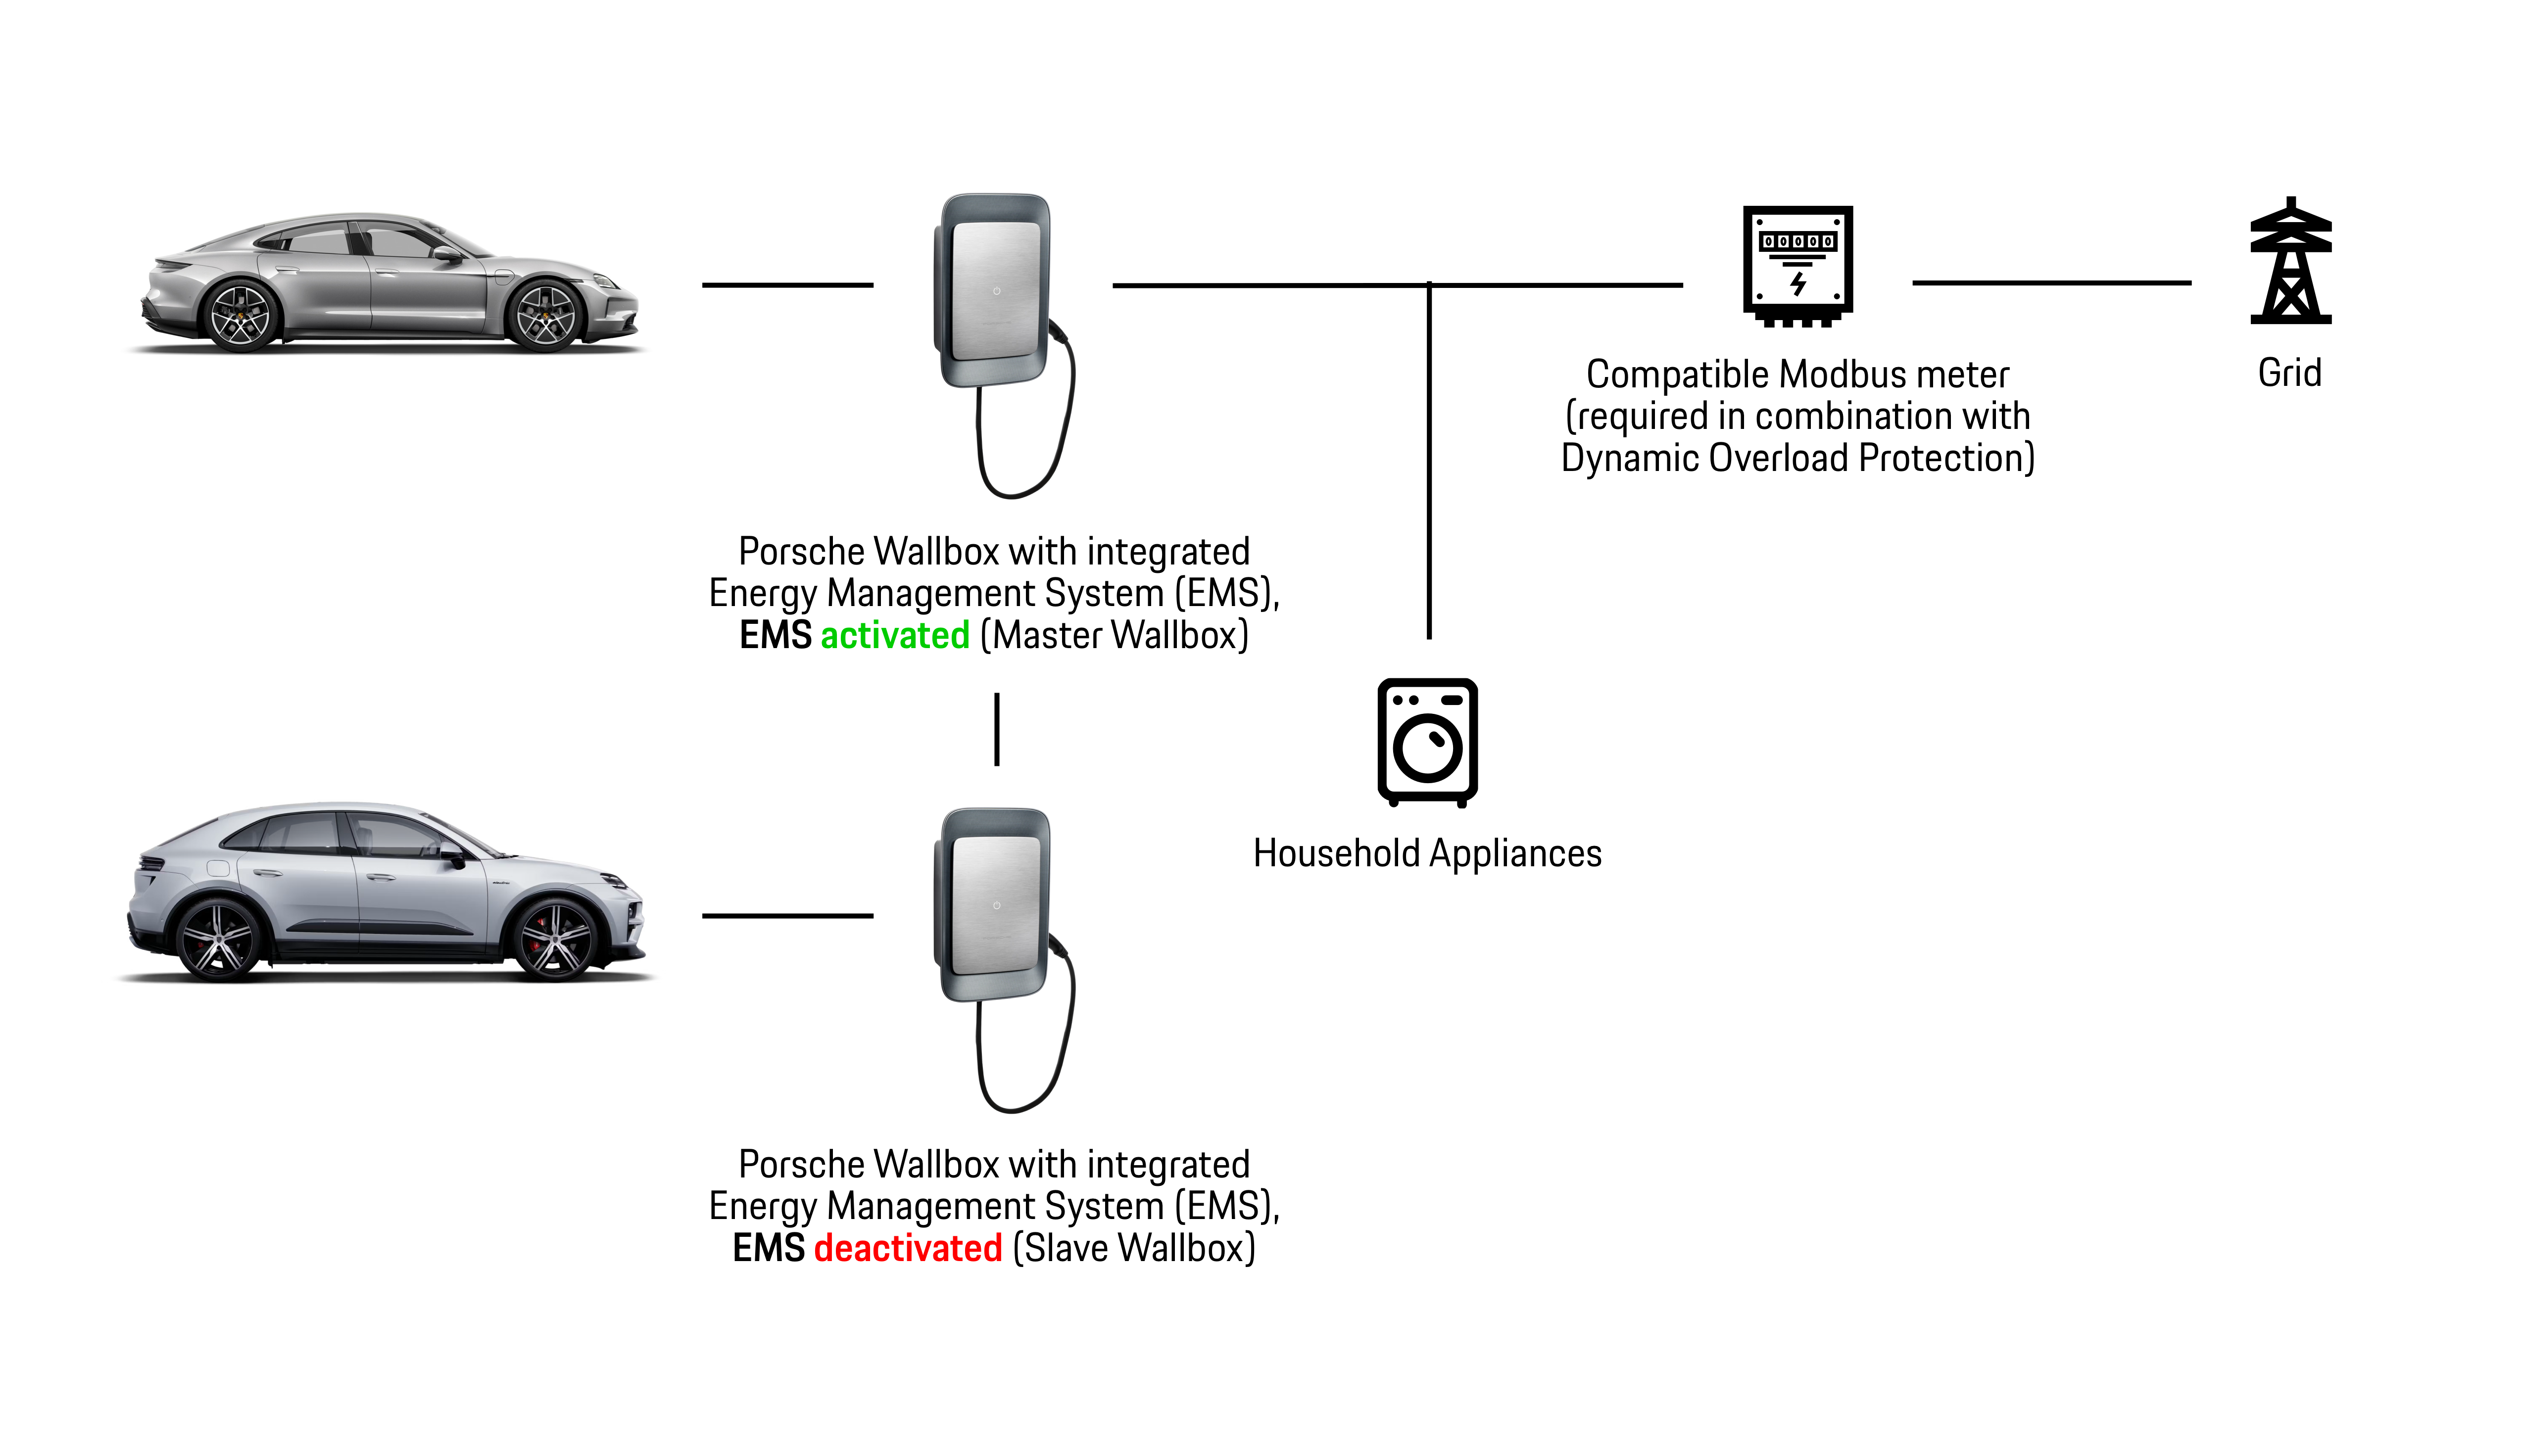
For example, if two cars are charging at the same time, the available charging power is shared between both Wallboxes. This allows both cars to charge simultaneously while ensuring that the maximum available circuit capacity is not exceeded. The car connected first is prioritised and receives the maximum available charging power. If additional power is available, the remaining capacity is automatically allocated to the second connected car.
To enable Load Balancing, one Porsche Wallbox acts as the controlling Wallbox (Master) with EMS activated, while additional Porsche Wallboxes are connected as secondary Wallboxes (Slaves).
Load Balancing can be implemented either dynamically or statically. For more information, see the sections “Dynamic Overload Protection” and “Static Overload Protection” above.
The Porsche Wallbox already includes its own energy management features. However, if you already have a Home Energy Management System (HEMS) in place, for example to coordinate solar energy with your heat pump or other appliances, connecting the Wallbox to this system may be beneficial. Integration is possible via Modbus or EEBUS protocols. Detailed setup information is available in the "Technical guide for electricians" section below.
This integration allows all connected devices to work together intelligently and helps keep your home energy flows coordinated and efficient. To enable integration, the Porsche Wallbox is configured as a secondary device (also referred to as a slave device in technical communication) in the Porsche Wallbox Web app. All further configuration and control are managed through your HEMS interface. In this setup, the Porsche Wallbox operates as a controlled device within your home energy ecosystem.
Different charging scenarios require different solutions. The overview below provides guidance on which intelligent charging function may be relevant for your situation. Whether you use a single Porsche Wallbox, operate multiple Porsche Wallboxes, or already have a Home Energy Management System (HEMS), the right solution depends on your home's individual electrical setup. A qualified electrician can assess your installation and recommend the most suitable configuration.
Example situations:
This chapter explains how to configure each function. These settings are quite technical and primarily intended for electricians. We recommend having a qualified electrician configure them during commissioning.
The Porsche Wallbox Installation Guide (included with the Wallbox or available online on the Owner's Manuals website) provides the basis for configuration. Below, you’ll find additional helpful information.
If you are configuring the Porsche Wallbox for the first time, the screens displayed in the Installation Wizard may look slightly different from the screenshots shown in this article. However, the configuration options and settings described are the same.
Please note:
Select the relevant intelligent charging function below to get started:
Configuration steps:
1. Connect your device to the Wi-Fi hotspot of your Porsche Wallbox. The hotspot name and password can be found in the access data letter included with your Porsche Wallbox. Then open https://10.0.2.1/ in a web browser and confirm any warning messages that may appear. On the Porsche Wallbox Web App login page, log in as a Service User. The required login details can also be found in the access data letter. Additional information: If you have previously connected your Porsche Wallbox to your home network, you can also access the Wallbox using the IP address assigned by your router or via https://pwbx-1234567/. Replace “1234567” with the serial number provided in the access data letter. For a better overview, we recommend using a desktop computer, laptop or tablet.
2. Ensure that your Porsche Wallbox software is up to date (in order to enable intelligent charging functions, a minimum of software version R03.004.045.303-PorscheWBX is required).
3. Under the Energy Management tab, activate Energy Management. By activating Energy Management, the device is set as master Wallbox.
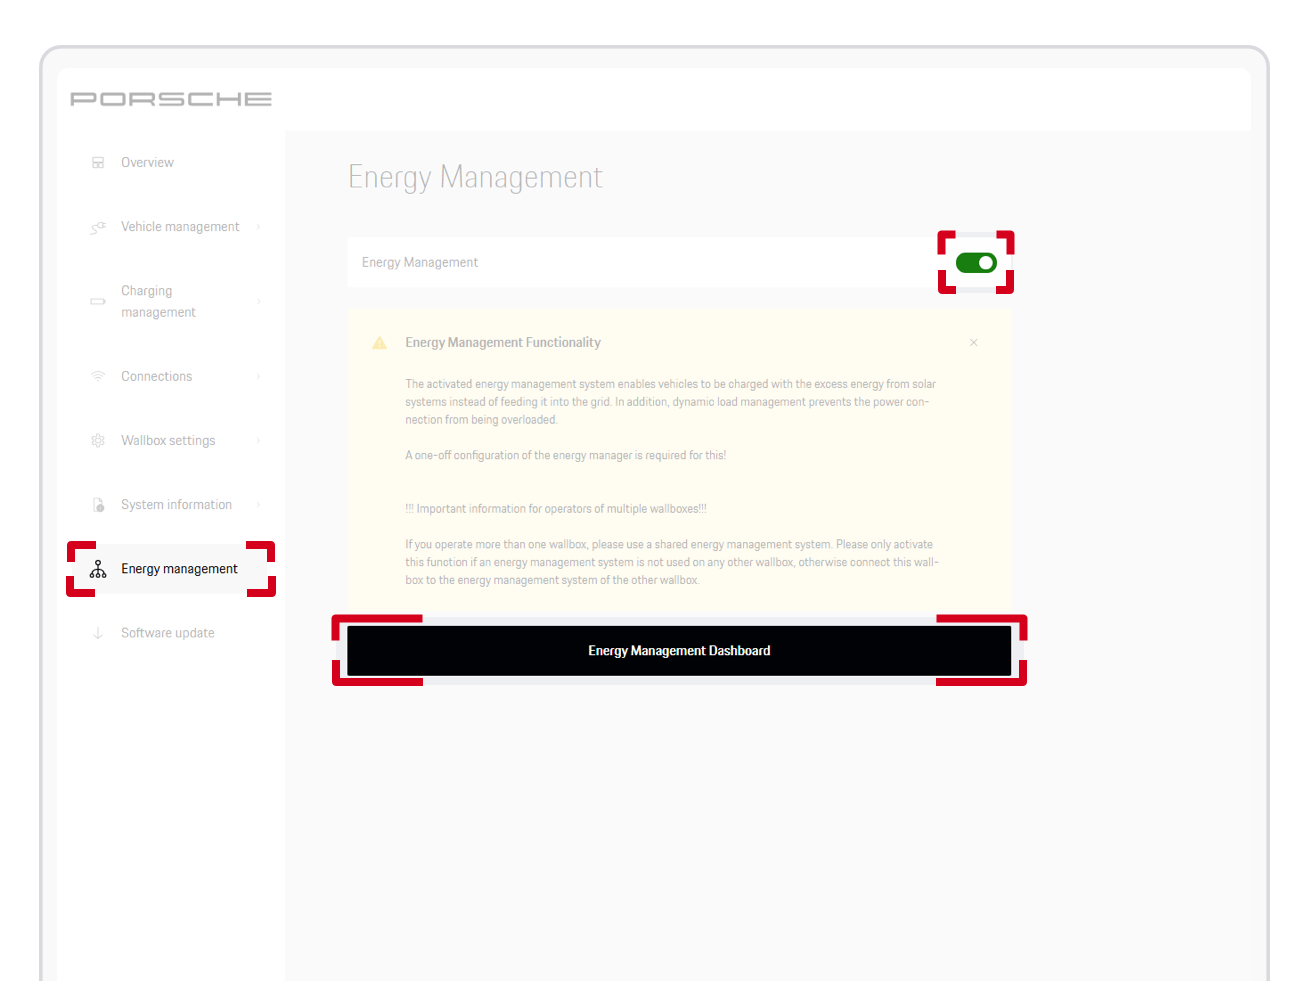
4. By clicking on the Energy Management Dashboard button, the Web app for the energy manager will open in a new window. Current limit per phase (ampere) for the grid connection point must be set via the pencil icon (under Configuration of grid connection point) to an appropriate limit. By activating Energy Management and setting up the current limit per phase for the grid connection point, all power limitation settings by the user (My Porsche app and/or Porsche Wallbox Web app) are then overruled.
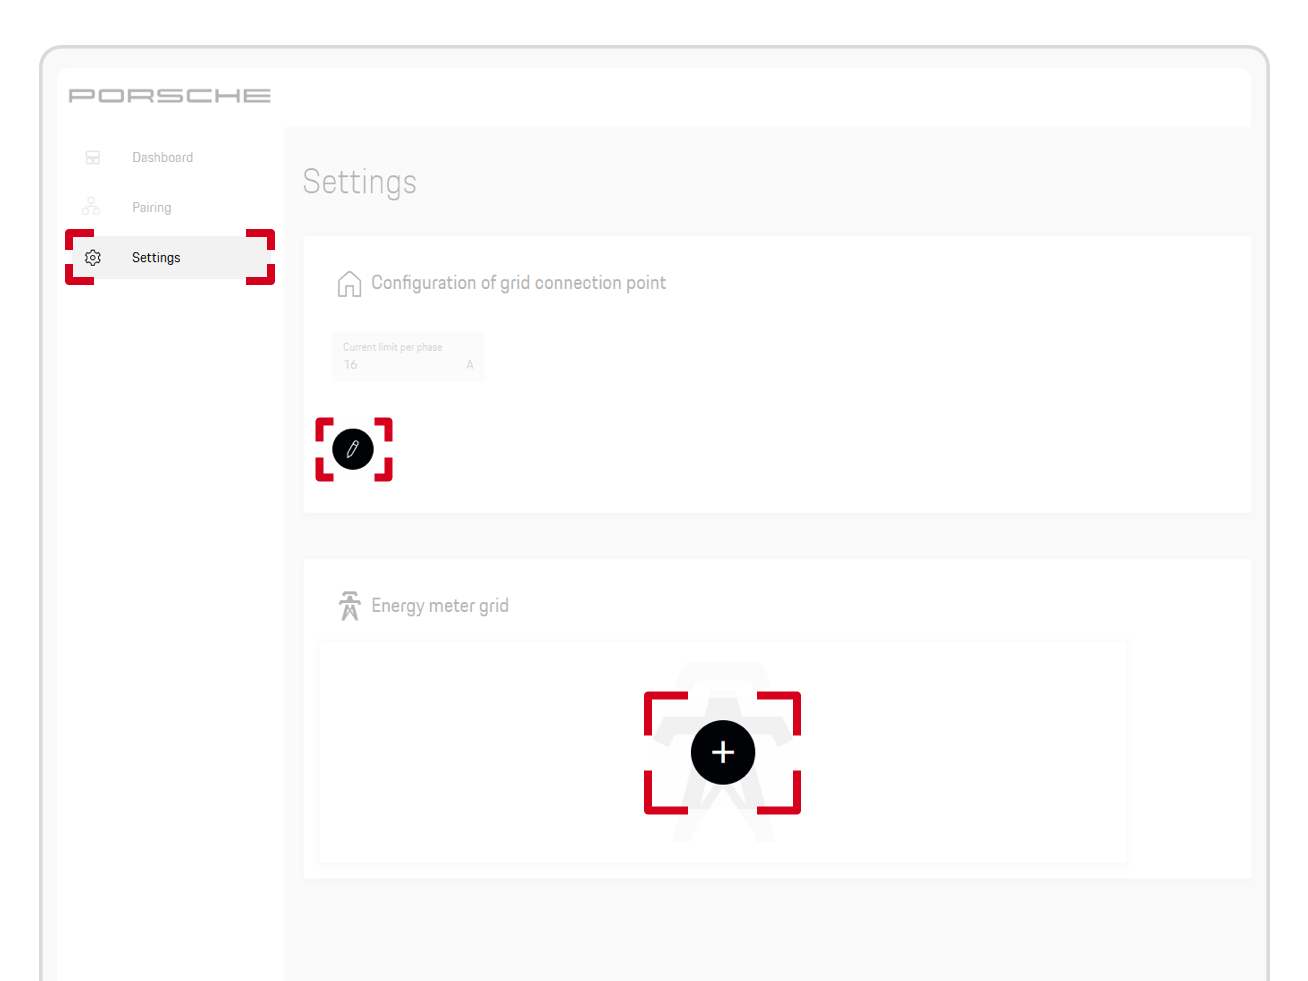
5. After setting up the current limit per phase without adding an energy meter via the plus icon (Energy meter grid), Static Overload Protection is automatically activated in the device. To add more Wallboxes and distribute the maximum available energy, please see the chapter below on “How to setup Load Balancing in the Porsche Wallbox Web application”.
A compatible Modbus meter needs is to be installed at the mains connection and integrated into the same local network as the Porsche Wallbox (or direct Ethernet connection via ethernet to the connection between Wallbox and Modbus meter). For example, select one of the following Modbus meters:
Modbus TCP (Ethernet)
Modbus RTU (requires additional TCP converter)
In the Energy Management Web app, the total circuit capacity is configured, and the connected meter is configured and added to the system settings.
Charging power is dynamically allocated among the Wallboxes, taking into account the power consumption of other devices on the circuit (first come first serve for Wallboxes).
Configuration steps:
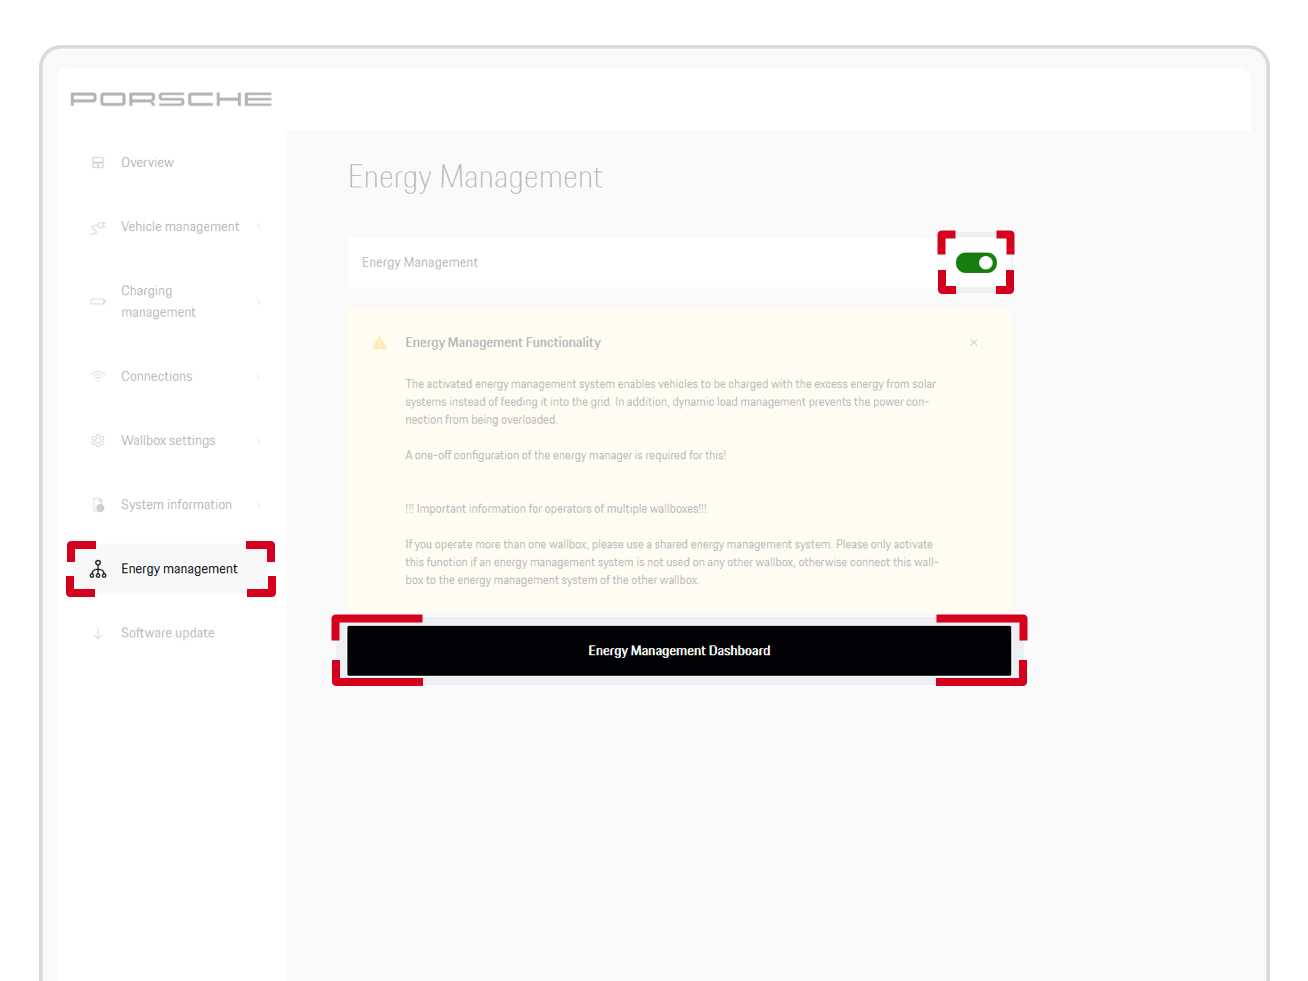
5. After setting up the current limit per phase via the pencil icon (under Configuration of grid connection point) a compatible Modbus meter must be added via the plus icon (under Energy meter grid).
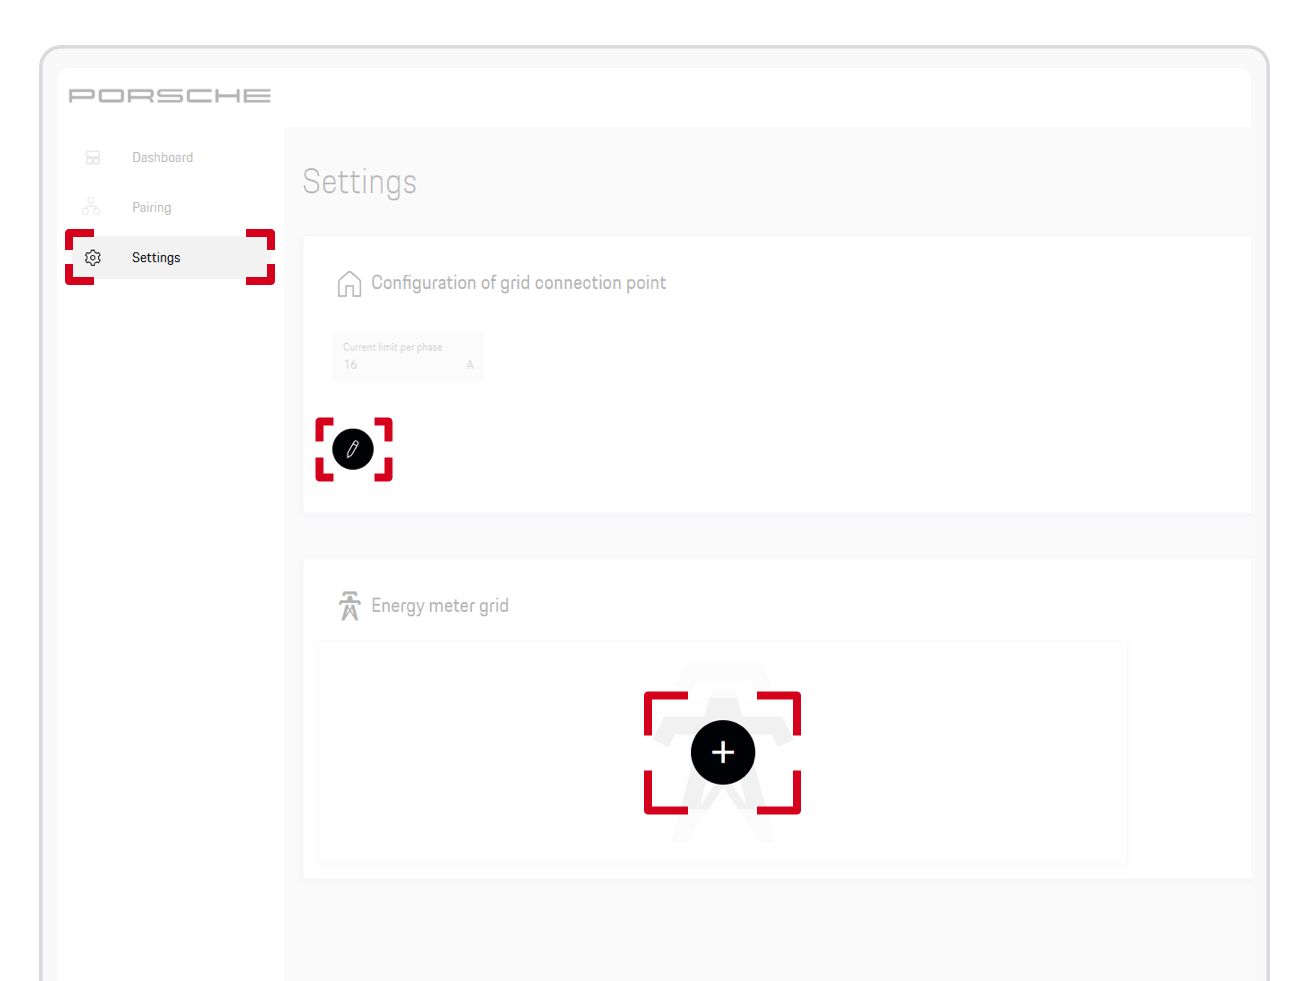
6. Meter specific data may be entered:
After entering the data, click on the save button to add the meter.
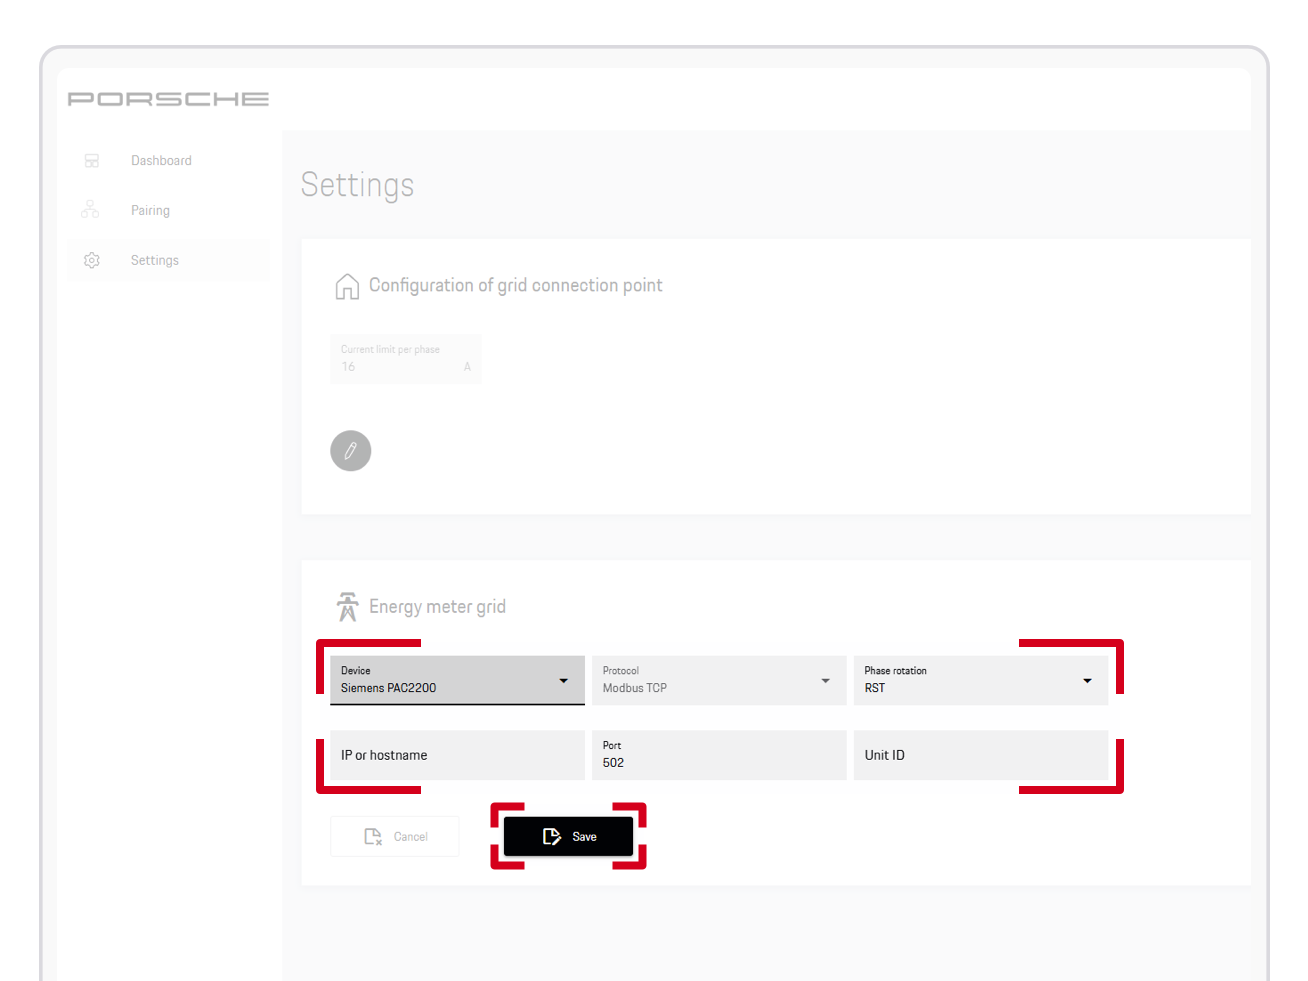
7. Dynamic Overload Protection is active when Energy Management is active, a limit is set and a compatibale meter is paired. All power limitation settings by the user (My Porsche app and/or Porsche Wallbox Web app) are overruled.
This function is primarily intended for setups with two or more Wallboxes. If only one Wallbox is installed, Dynamic Load Management can still be used as blackout protection.
To enable Load Balancing, the Energy Management System (EMS) is activated in one Wallbox, which then acts as the master unit. The additional Wallboxes are paired with it during configuration and operate as slave units.
Prerequisites:
Configuration steps:
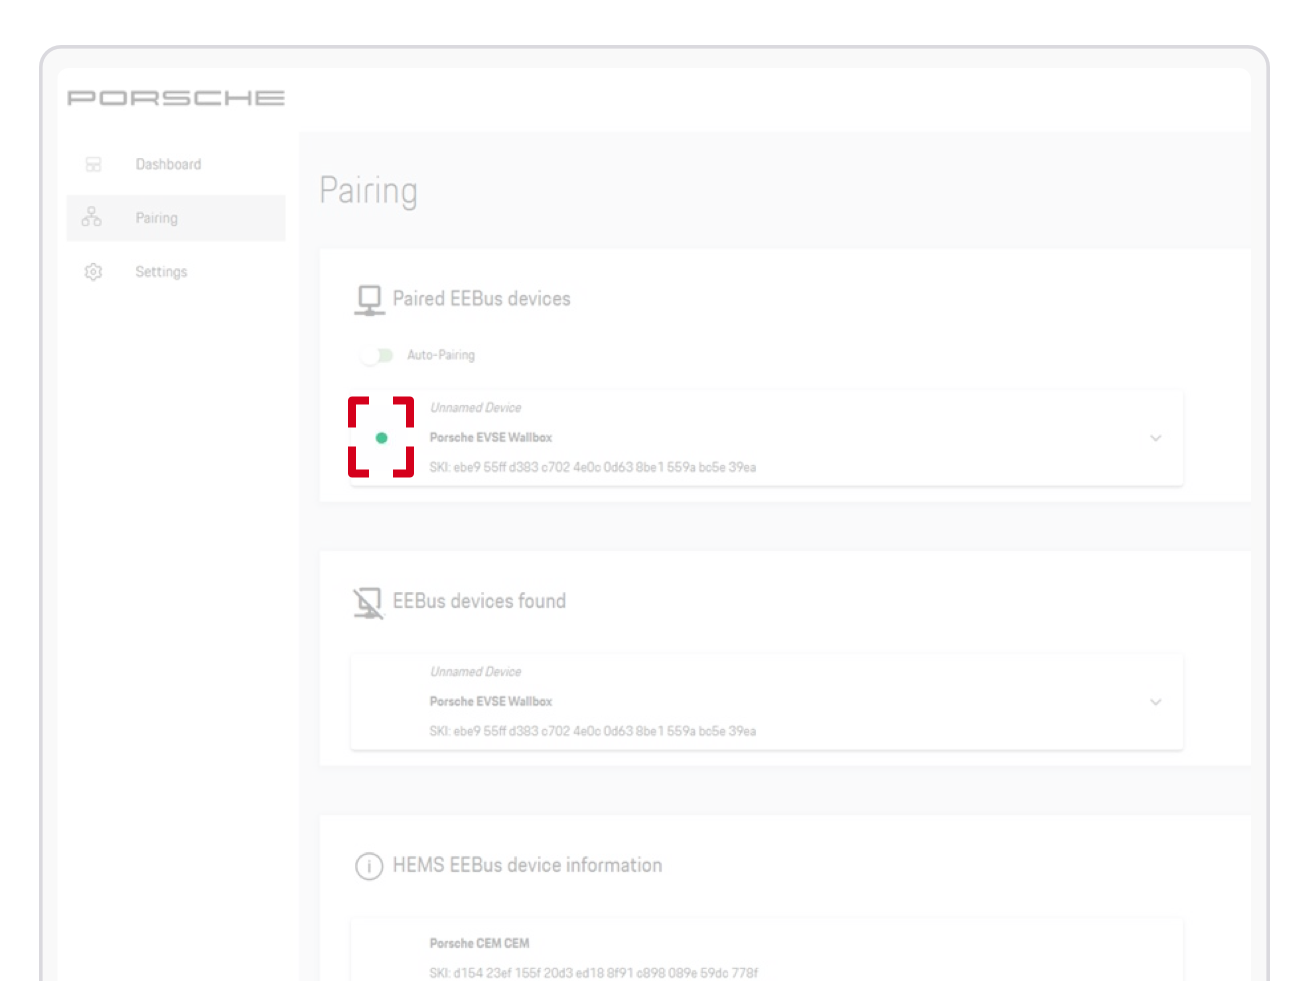
3. To confirm pairing, access the first slave Wallbox’ Web app and accept the master Wallbox request under Connections > EEBUS-HEMS > EEBUS Devices Found by clicking on the device.
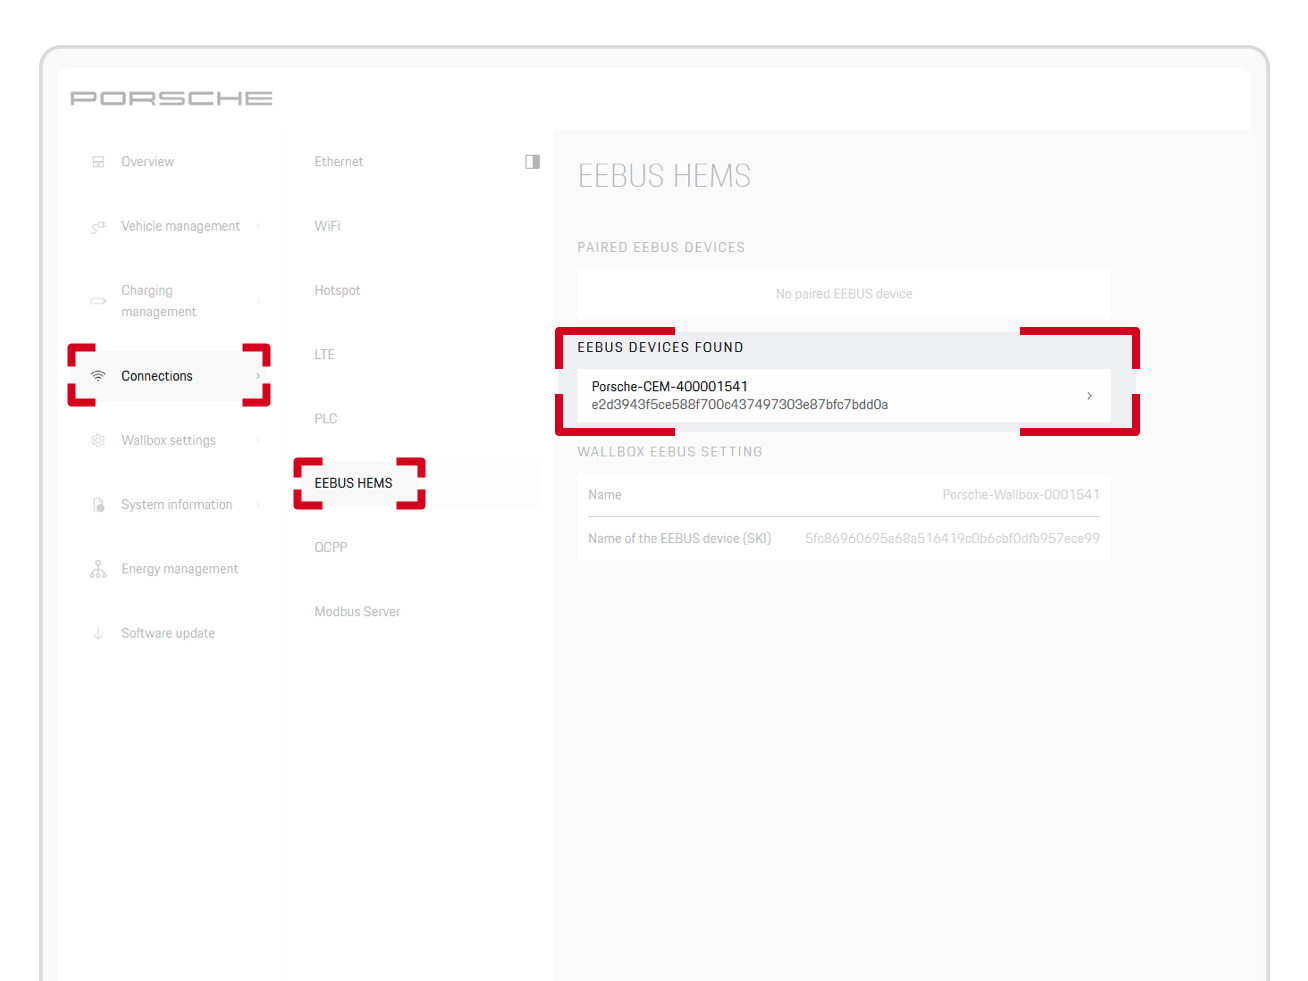
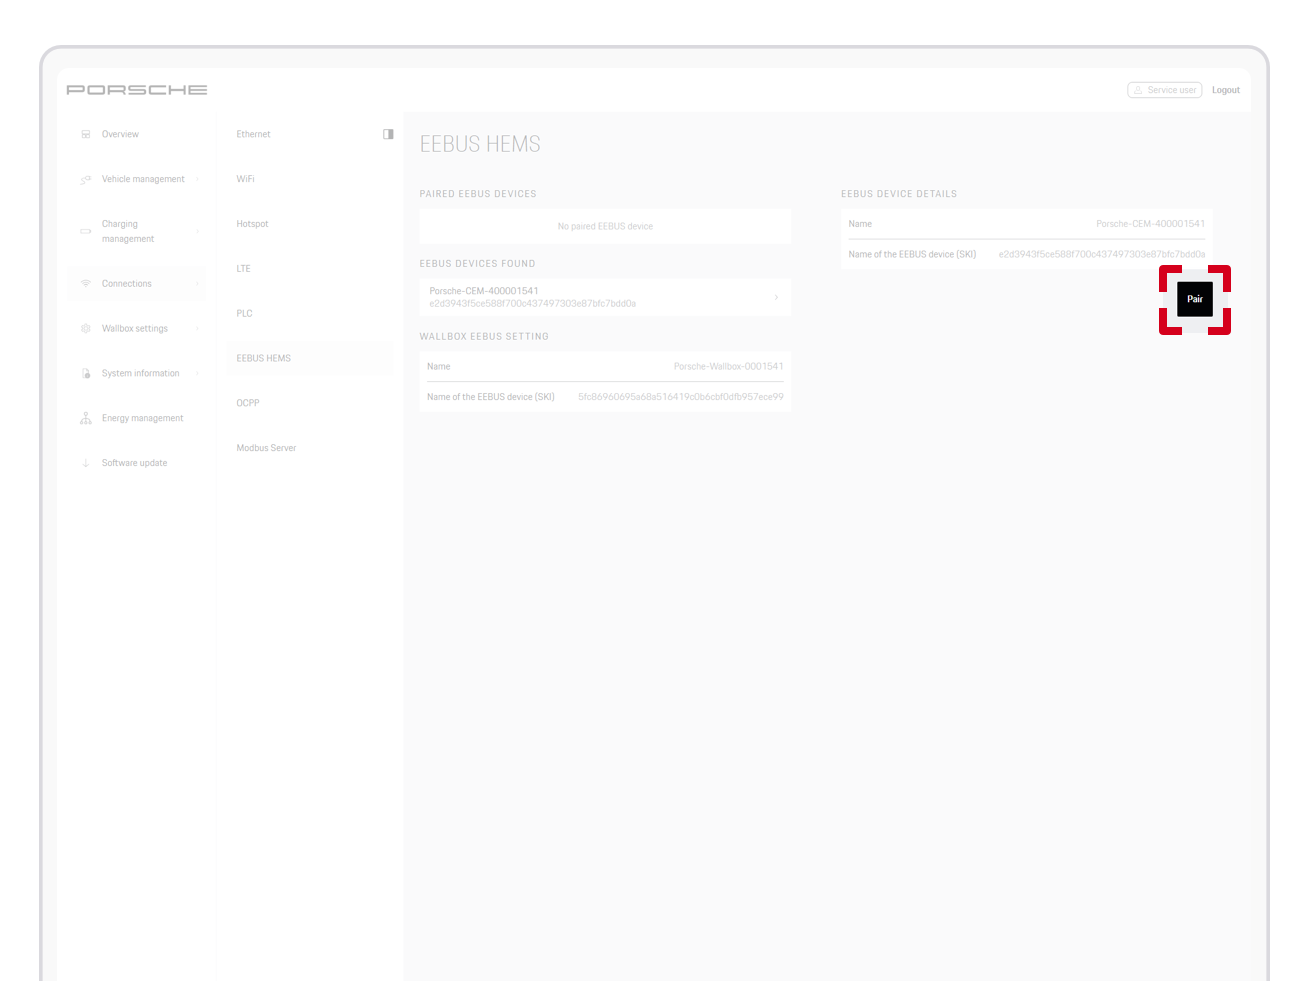
4. By clicking on the pair icon, the device will be added to the paired EEBUS devices list.
5. If there are any further Wallboxes to be added, step 4 may be repeated on every Wallbox to be connected
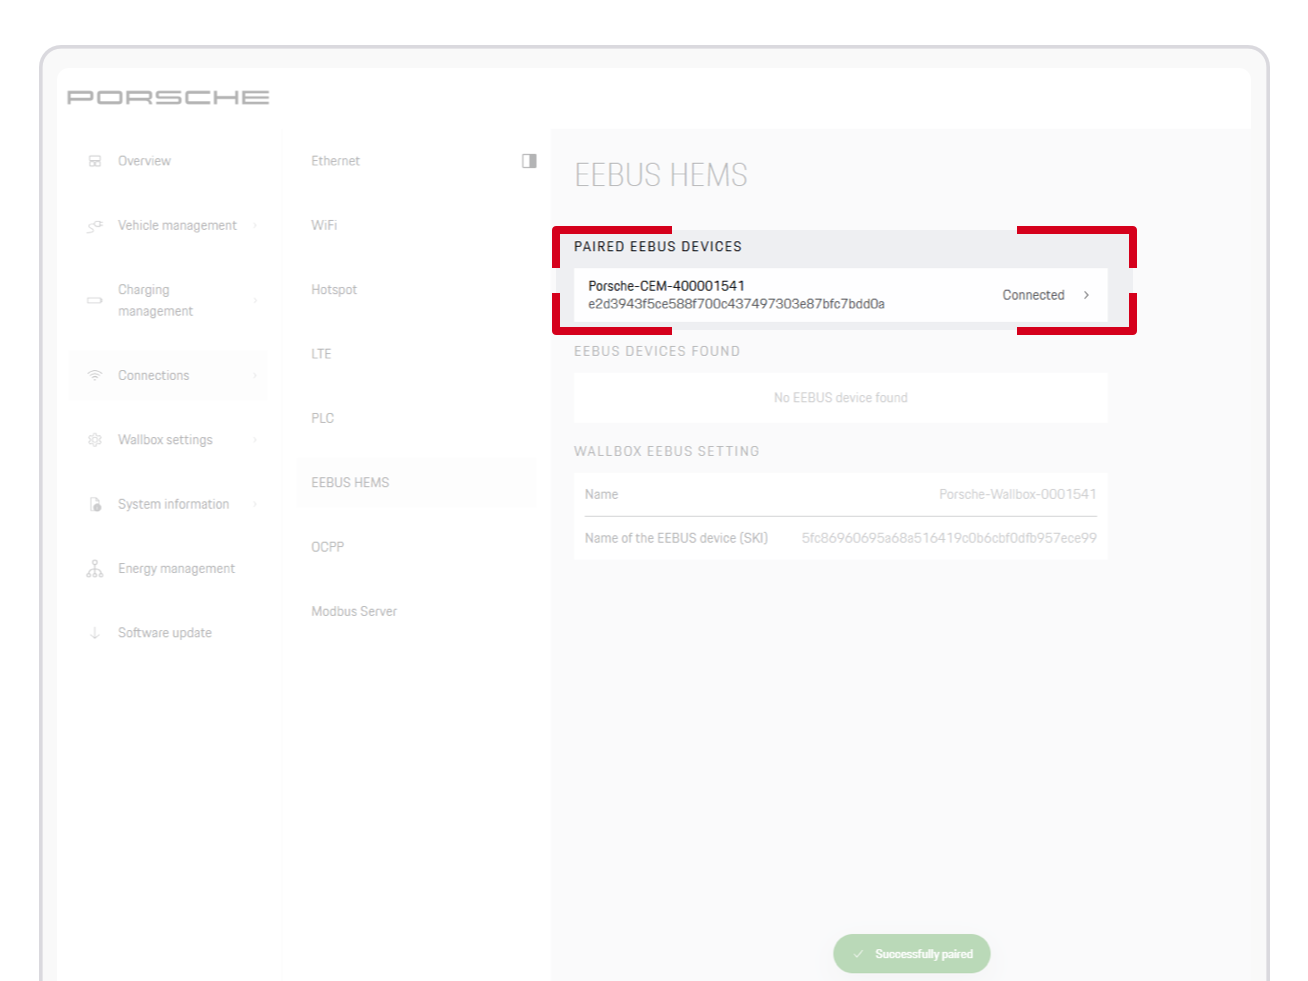
The available power is automatically distributed among the paired devices.
Depending on the external Home Energy Management System (HEMS), the Porsche Wallbox can be integrated and controlled via Modbus or EEBUS. Modbus communication is based on the Heidelberg Amperfied Modbus register map specification (to be downloaded below), while EEBUS enables standardized energy management communication between compatible devices within the local energy ecosystem.
Download:
Configuration steps:
1. Connect your device to the Wi-Fi hotspot of your Porsche Wallbox. The hotspot name and password can be found in the access data letter included with your Porsche Wallbox. Then open https://10.0.2.1/ in a web browser and confirm any warning messages that may appear. On the Porsche Wallbox Web App login page, log in as a Service User. The required login details can also be found in the access data letter. Additional information: If you have previously connected your Porsche Wallbox to your home network, you can also access the Wallbox using the IP address assigned by your router or via https://pwbx-1234567/. Replace “1234567” with the serial number provided in the access data letter. For a better overview, we recommend using a desktop computer, laptop or tablet.
2. Ensure that Wallbox software is up to date (to enable intelligent charging functions, at least R03.004.045.303-PorscheWBX software version required).
3. Click on Connections > Modbus Server > activate Modbus Server
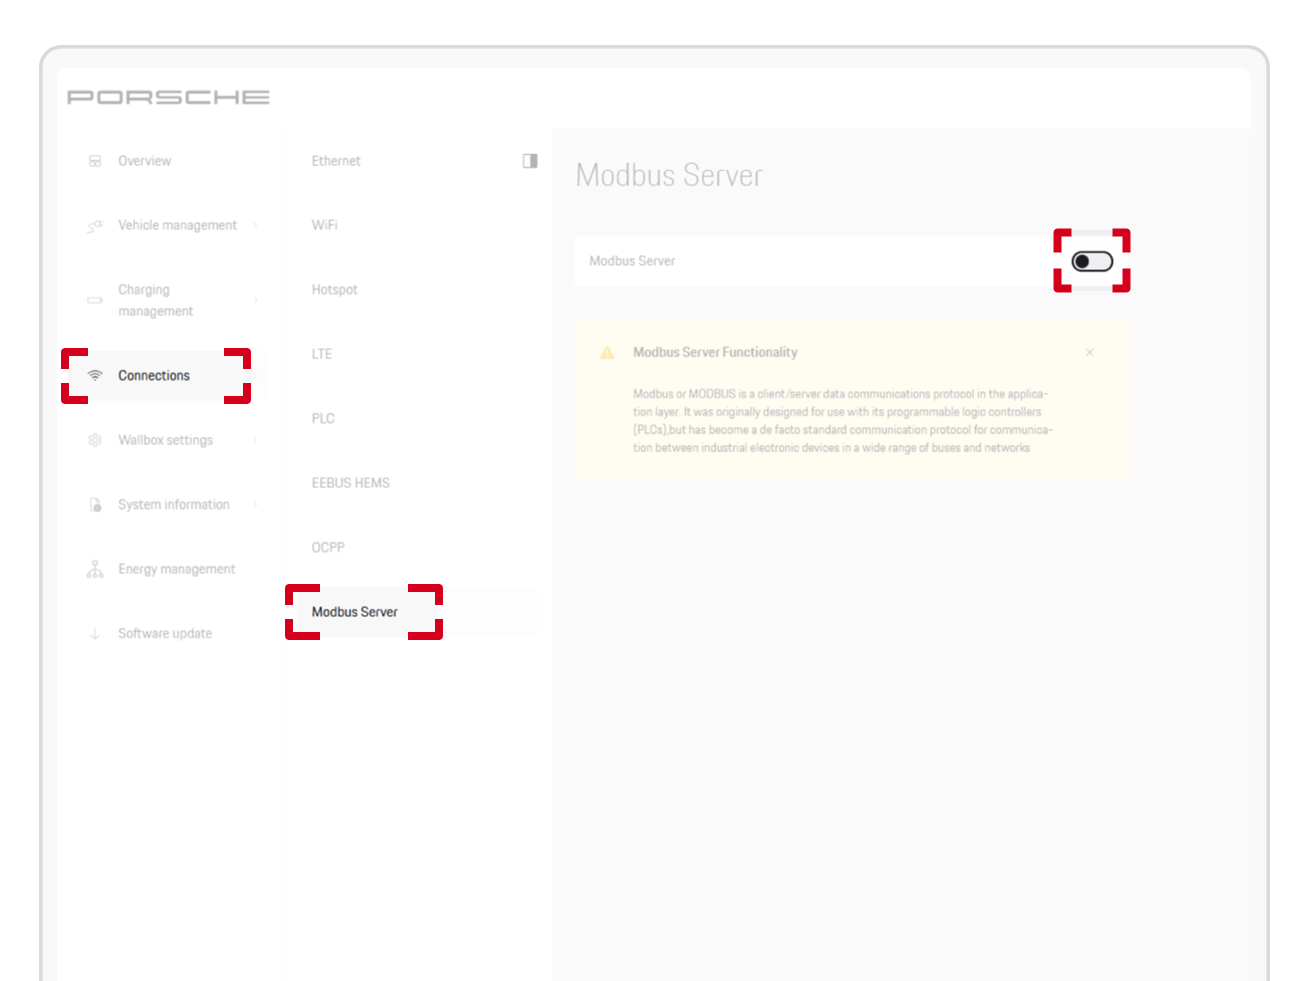
The Wallbox is now configured as Modbus “Server” and can be configured by any Modbus “Client”.
Configuration steps:
5. By clicking on the pair button, the device will be added to the paired EEBUS devices list.
If pairing is successful, it will be displayed in this window:
If you require further guidance, we can assist you in finding the right solution.
Some of the described products, features, and processes may vary depending on the country, model, and model year.